Monday, August 6, 2012
Cupcake Challenge 204
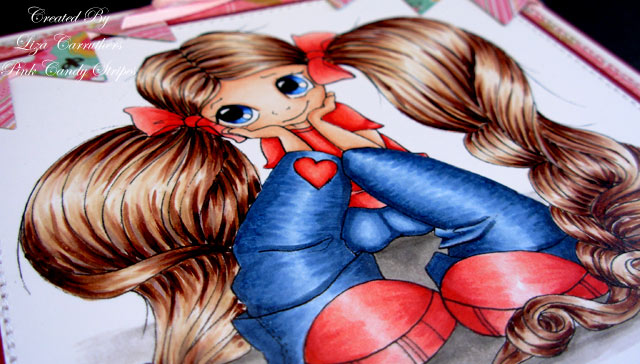
Hello everyone, today on Cupcake Challenge 204 we have a theme of bunting and this week we are sponsored by Simon Says Stamp who are giving us a $20 gift certificate as a prize and Saturated Canary who are giving us the fabulous prize of 2 digi images. Krista has also very kindly offered the DT images to use and I chose Hairy Situation which can be purchased from the Saturated Canary Store.
For my card I have coloured my image with copics, I love her hair so I printed the image out fairly large and made her the focus of the card. The DP is from MME and I used a star shaped nestie to make my bunting....I cut out a star shape and cut the points off, I then used glossy accents to stick them to a piece of 3mm ribbon.
Supplies
Card/Paper: Red and white card. MME
Stamps: Saturated Canary - Hairy Situation
Colouring: Copics - E000, E00, E11, E50, E31, E71, E25, E29, B23, B39, B93, B95, B97, R20, R22, R27, W1, W3, W5, 0
Embellishments: Ribbon
Tools: Trouvaille, nesties
Thanks for looking x
Friday, August 3, 2012
Tilda with a Gift for You
Hello everyone, today I have a card to show you featuring some stamps from the new Magnolia Turning Leaves Collection 2012. I am entering this card into Just Magnolia and Hanglar Challenge 168 which has a theme of anything goes.
For my card I have used a fab layout that I saw on Claudia's blog, I think it is a great layout that you can use to show off your mini stamps and accessory stamps and you can also use up some small (ish) strips of DP that you may have left. I have used Tilda with a gift for you as my main image and she is from Magnolia Turning Leaves Collection 2012 and is coloured with copics and highlighted with stickles. The DP is from Colorbok and I have used doohickey dies to create the decorative edges on the pockets.
I cut four tags using two different doohickey dies and I added a brad into each hole....I thought adding ribbon to all of them would be a bit much.

Finally, a photo of all the tags..... I have used Mini Scooter Tilda and Mini Tilda with Daisies and Mushrooms..... for the sentiments I used the Limited Edition Text Stamp from the Turning Leaves Collection and Have a Sunny Day from the Summer Memories Collection 2012, I then used the large and small Autumn Sunflowers to create a border. All of them are coloured with copics.
Supplies
Card/Paper: Blue and white card. Colorbok - Sorbet
Stamps: Magnolia - Turning Leaves and Summer Memories Collections 2012.
Colouring: Copics - sorry no list of colours!
Embellishments: Brads, ribbon, stickles
Tools: Trouvaille, Doohickey Dies, nesties, bow easy
Thanks for looking x
Saturday, July 28, 2012
Tailor Tilda
Hello everyone, today I have a card to show you using new stamps from the Magnolia Turning Leaves Collection 2012. I am entering this card for the following challenges: Simon Says has a theme of anything goes, Totally Tilda Challenge 51 would like to see a Tilda stamp and a Magnolia sentiment, Stamptacular Challenge 173 has a theme of to die for and they would like to see at least two die cuts on your creation and finally, Tilda's Town Challenge 11 has a theme of technique and my technique is SEWING.
For my card I have used Tailor Tilda from the Magnolia Turning Leaves Collection 2012 and she is coloured with copics and highlighted with stickles. The Limited Edition text stamp is also from the same collection. The DP is from DCWV, I have used a doohickey for the decorative edge and I have finished off with some ribbon and jewels.
Supplies
Card/Paper: White and kraft card. DCWV - Linen Closet
Stamps: Magnolia - Tailor Tilda, Limited Edition Text - Turning Leaves Collection 2012
Colouring: Copics
Embellishments: Ribbon, jewels, stickles
Tools: Trouvaille, nesties, corner chomper, doohickey die.
Thanks for looking x
Labels:
Copics,
Magnolia,
Nestabilities,
Simon Says,
Stamptacular
Monday, July 23, 2012
Cupcake Challenge 202
Hello everyone, today on Cupcake Challenge 202 we have a theme of the ocean and this week we are sponsored by Lili of the Valley who are giving us a £10 gift voucher as a prize and Scrap Affair who are giving us 3 ranger re-inkers as a prize.......fabulous!
For my card I used Little Mermaid Tilda from the Magnolia Bon Voyage Collection 2010 and she is coloured with copics and highlighted with glossy accents. The DP is from Cosmo Cricket and I finished off with some gauze, flowers and jewels.
Supplies
Card/Paper: White and kraft card. Cosmo Cricket - Salt Air
Stamps: Magnolia - Little Mermaid Tilda - Bon Voyage Collection 2010
Colouring: Copics
Embellishments: Flowers, gauze, glossy accents, jewels
Tools: Sewing machine, trouvaille, nesties
Thanks for looking x
Tuesday, July 17, 2012
Travelling Copic
Hello everyone, today I have a card for some challenges; Copic Marker Europe are celebrating their first birthday and Krista Smith has created this fabulous image for the occasion, she is called travelling copic and was being given away on the Copic Marker Europe blog, Papertake has a theme of girly, Totally Papercrafts Challenge 125 has a theme of layers, and Saturated Canary Challenge 21 has a theme of bling.
For my card I coloured up this fabulous image with copics (of course!) and I used a doohickey to cut the decorative edge on my image layer. The DPs are from Basic Grey, the sentiment from Cats Life Press and I finished off with some ribbon and jewels.
Supplies
Card/Paper: Red and white card. Basic Grey - Sugar Rush
Stamps: Saturated Canary - Travelling Copic, Sentiment - Cats Life Press
Colouring: Copics
Embellishments: Ribbon, jewels
Tools: Trouvaille, nesties, doohickey die, sewing machine
Thanks for looking x
Labels:
Copics,
Papertake,
Saturated Canary,
Totally Papercrafts
Monday, July 9, 2012
Cupcake Challenge 200
Hello everyone, today on Cupcake Challenge 200 we have a theme of number cruncher and we would like to see something numeric on your cards/projects. This week we are sponsored by Quixotic Paperie who are giving us a £10 gift certificate to spend in their store and Sassy Studio Designs are giving one lucky winner the choice of 4 digi images. I am also entering my card into this week's Papertake Challenge where the theme is anything goes.
For my card I have used a Karen Lockhart stamp and it is coloured with copics. The DP is from basic grey, the sentiment is computer generated and I have added some glossy accents to the vase. My decorative edge was done with a magnolia doohickey die and I finished off with a ribbon and some jewels.
Supplies
Card/Paper: Red and white card. Basic Grey - Picadilly
Stamps: Karen Lockhart - Cottage Flowers
Colouring: Copics
Embellishments: Ribbon and jewels
Tools: Sewing machine, trouvaille, doohickey die, nesties
Thanks for looking x
Monday, July 2, 2012
Cupcake Challenge 199
Hello everyone, today on Cupcake Challenge 199 we have a theme of bright as a button and we would like you to use bright colours and at least one button on your card/project. This week we have two fabulous sponsors; Digi Doodle Shop have given us a $10 gift certificate for one lucky winner and Simon Says Stamp have given us a prize of a $20 gift certificate to spend in their store.
I am also entering my card for the following challenges; Totally Tilda Challenge 50 has a theme of beside the seaside, Totally Gorjuss Challenge 138 has a theme of sweet and simple and Charisma Cardz Challenge 25 has a theme of anything goes.
For my card this week I have made a mini one! I used my spellbinders romantic rectangles dies to create the card base - the second largest die from the set. I have used Mini Ohoj Tilda from the Magnolia Summer Memories Collection 2012 and she is coloured with copics. The sentiment is from the same collection and the DP is from basic grey; I have used up some scraps and made a patchwork background. I finished off with some jewels, ribbon and buttons.
Supplies
Card/Paper: White and pink card. Basic Grey - Lemonade
Stamps: Magnolia - Mini Ohoj Tilda & Sentiment - Summer Memmories Collection 2012
Colouring: Copics
Embellishments: Ribbon, buttons, twine, jewels
Tools: Nesties, trouvaille, sewing machine
Thanks for looking x
Labels:
Charisma Cardz,
Copics,
Cupcake,
DT,
Magnolia,
Nestabilities,
Totally Gorjuss
Wednesday, June 27, 2012
Winner
Hello everyone, today I have a card to enter in some challenges; Just Magnolia and Hanglar Challenge 162 has a theme of summer colours, this week's Simon Says has a theme of sporty/patriotic, Creative Card Crew Challenge 13 has a theme of 1-2-3 (mine is 1 sentiment, 2 images and 3 DPs), Creative Inspirations Challenge 169 has a theme of anything goes, and CCT Challenge 222 has a summer theme.
The images were quite large on this card so I kept them as the main focus. I have used Chequered Flag Tilda from the Magnolia Winner Takes it All Collection 2012 and she is coloured with copics, my second image is Tilda's Car from the Magnolia Sweet Rainbow Collection 2011 and it is coloured with copics and highlighted with glossy accents. The DPs are from Echo Park and I finished off with a computer generated sentiment and some jewels.
Supplies
Card/Paper: White, red and yellow card. Echo Park
Stamps: Magnolia - Chequered Flag Tilda - Winner Takes it All Collection 2012. Tilda's Car - Sweet Rainbow Collection 2011.
Colouring: Copics
Embellishments: Jewels, glossy accents
Tools: Sewing machine, nesties
Thanks for looking x
Labels:
CCT,
Copics,
Creative Card Crew,
Creative Inspirations,
Magnolia,
Nestabilities,
Simon Says
Saturday, June 23, 2012
Copic Colouring on Kraft - Tutorial
Hello everyone, a few weeks ago I said I would post my copic colouring on kraft tutorial, so here goes.... I have probably put in far too many steps, but I didn't want to miss anything out!!!
Step 1: I stamped Princess Lizzy onto Joy Craft’s Kraft coloured cardstock using memento tuxedo black ink. When colouring with copics on kraft I would advise that you use a scrap piece to test your colours before you use them on your image as the kraft card alters the tone of your copic colours. Also, when testing your colours, leave them a moment as they lighten up when they dry.
Step 2: Next add E00 and go over the area you have just coloured.
Step 3: Add a little E11 to the areas which will be in shadow.
Step 4: Using your E00, blend your E11 using small feather strokes. Finally, using your E000, blend out your E00 and colour over the area that you have previously left uncoloured. Repeat this process for all the skin areas.
Step 9: Using your colours in reverse begin to blend using small feather strokes. As this is hair you don’t want to blend your colours completely, using strokes will give the impression of flowing, textured hair. Your final colour will be E50, use this to colour any blank areas. At this point I always take a look at my image and if I feel I want to darken any shadows in the hair I use my darkest colour and I use my blender pen to remove a little colour from the highlighted areas.
Step 17: Finally I used W1, W3, W5, W7 and 0 to colour the ground.
Finally, here is the image on a card.
Supplies
Card/Paper: White and kraft card. DCWV - Linen Closet
Stamps: Joy Crafts - Princess Lizzy
Colouring: Copics - details above
Embellishments: Ribbon, jewels
Tools: Trouvaille, sewing machine, Joy Crafts - flourish dies
Thanks for looking x
Step 1: I stamped Princess Lizzy onto Joy Craft’s Kraft coloured cardstock using memento tuxedo black ink. When colouring with copics on kraft I would advise that you use a scrap piece to test your colours before you use them on your image as the kraft card alters the tone of your copic colours. Also, when testing your colours, leave them a moment as they lighten up when they dry.
Firstly, I always start by colouring the skin tones and I
begin with my lightest colour which is E000. Lay down your colour where all the
dark shadows will be and leave the area which will be lightest uncoloured.
Step 2: Next add E00 and go over the area you have just coloured.
Step 3: Add a little E11 to the areas which will be in shadow.
Step 4: Using your E00, blend your E11 using small feather strokes. Finally, using your E000, blend out your E00 and colour over the area that you have previously left uncoloured. Repeat this process for all the skin areas.
Step 5: For the hair, once again, I start with my lightest
colour which is E50. Lay down your colour using fine strokes where the darkest
parts will be. When colouring hair always do your strokes in the direction the
hair would grow.
Step 6: Next, using fine strokes, go over your E50 with E35.
Step 7: Add E25 to your darker areas. At this point if you
have covered all of your original E50, don’t worry as we will be adding more!
Step 8: Add a little E29 to the darkest areas of the hair.
Step 9: Using your colours in reverse begin to blend using small feather strokes. As this is hair you don’t want to blend your colours completely, using strokes will give the impression of flowing, textured hair. Your final colour will be E50, use this to colour any blank areas. At this point I always take a look at my image and if I feel I want to darken any shadows in the hair I use my darkest colour and I use my blender pen to remove a little colour from the highlighted areas.
Step 10: To colour the eyes I used B32, B23 and B39.
Step 11: For the dress, again I begin with my lightest
colour which is BG000. Lay down your colour where your darkest area will be and
leave your lightest area uncoloured. In this photo you will notice my scrap
piece of card which I used to test my colours.
Step 12: Next, add BG01
Step 13: Add your mid tone which is BG05.
Step 14: Finally, add a little of your darkest colour which
is BG09.
Step 15: As before, use your colours in reverse to blend and
use your final colour, BG000, to colour your previously uncoloured area. I
always colour in small areas because the ink remains wet and you can achieve a
good blend. Colour the remaining areas of the dress. In this photo I have also
coloured the shoes and her necklace.
Step 16: I only used Y17 to colour her crown as it is such a
small area and I used C1 and my blender pen to colour the underskirt, gloves
etc.
Step 17: Finally I used W1, W3, W5, W7 and 0 to colour the ground.
Finally, here is the image on a card.
Supplies
Card/Paper: White and kraft card. DCWV - Linen Closet
Stamps: Joy Crafts - Princess Lizzy
Colouring: Copics - details above
Embellishments: Ribbon, jewels
Tools: Trouvaille, sewing machine, Joy Crafts - flourish dies
Thanks for looking x
Monday, June 18, 2012
Cupcake Challenge 197
Hello everyone, today over on Cupcake Challenge 197 we have a theme of something in the eyelet and we would like to see you use eyelets on your cards or projects. This week we are sponsored by Crafts U Love who are giving us a £15 gift voucher as a prize and Tickled Pink Stamps are giving one lucky winner their choice of three digi images. I am also entering my card for the following challenges; Secret Crafter Challenge 190 has a theme of red, white and blue, Magnolia Down Under Challenge 151 has a bingo theme (Ribbon, Tilda and Sentiment), Cute Card Thursday Challenge 221 has a theme of punches, and Creative Inspirations Challenge 167 has a theme of red, white and blue.
For my card this week I decided to use my MS punch to create a pretty edge, so my card is smaller than usual at 5 x 5 inches. I have used Tilda Offshore from the Magnolia Summer Memories Collection 2012 and she is coloured with copics. The DP is from basic grey and the sentiment is from WOJ. I finished off with some ribbon, stitching and eyelets.
Supplies
Card/Paper: White and blue card. Basic Grey - Life of the Party
Stamps: Magnolia - Tilda Offshore - Summer Memories Collection 2012. Sentiment - WOJ
Colouring: Copics - E000, E00, E11, Y11, Y21, YR23, R22, R27, R59, B93, B95, B97, C1, C3, C5, C7. 0. Silver gel pen
Embellishments: Eyelets, ribbon
Tools: MS Punches, nesties, sewing machine trouvaille, corner chomper and crop-a-dile
Thanks for looking x
Labels:
CCT,
Copics,
Creative Inspirations,
Cupcake,
DT,
Magnolia,
Secret Crafter
Sunday, June 10, 2012
Lizzy with Strawberries
Hello everyone, today I have a summery card to share with you. I am entering it into the following challenges; Totally Gorgeous Challenge 135 has a theme of sunshine, Fussy and Fancy Challenge 64 has a theme of swirls and flourishes, this week's Papertake Challenge has a theme of anything goes and Creative Card Crew Challenge 12 has a theme of song inspired - mine is Strawberry Fields Forever by the Beatles.
For my card I have used Lizzy with strawberries and she is coloured with copics. The DP is from doodlebug (I think) and I have used a Joy Crafts stencil for my embossed panel. The flourish was cut with a Joy Crafts die and I finished off with some ribbon and jewels from my stash.
Supplies
Card/Paper: White and pink card, doodlebug (I think)
Stamps: Joy Crafts - Lizzy with strawberries
Colouring: Copics
Embellishments: Ribbon, jewels
Tools: Trouvaille, Joy Crafts flourish die, Joy Crafts embossing stencil, sewing machine, bow easy
Thanks for looking x
For my card I have used Lizzy with strawberries and she is coloured with copics. The DP is from doodlebug (I think) and I have used a Joy Crafts stencil for my embossed panel. The flourish was cut with a Joy Crafts die and I finished off with some ribbon and jewels from my stash.
Supplies
Card/Paper: White and pink card, doodlebug (I think)
Stamps: Joy Crafts - Lizzy with strawberries
Colouring: Copics
Embellishments: Ribbon, jewels
Tools: Trouvaille, Joy Crafts flourish die, Joy Crafts embossing stencil, sewing machine, bow easy
Thanks for looking x
Labels:
Copics,
Creative Card Crew,
DT,
Fuss and Fancy,
Noor Design,
Papertake,
Totally Gorjuss
Wednesday, June 6, 2012
TOMIC Challenge 53
Hello everyone, it is our 1 year anniversary today over on the TOMIC Challenge blog and it is my last challenge as a TOMIC DT member for a while.....I am expecting a baby in September and I have chosen to stand down for the next 6 months at least to give myself a break. For this special challenge we have a theme of anything goes and we have lots of prizes for you.
For my card I have used Edwin in Miami from the Magnolia Summer Memories Collection 2012 and he is coloured with copics and highlighted with glossy accents. I have also used the Memory Shells and the Have a Sunny Day Sentiment from the same collection. I used my new Spellbinders Romantic Rectangles dies to cut out my image and while it was still in the die I sponged broken china and antique linen distress inks onto it to create the background. My DP is from DCWV and I finished off with some ribbon and jewels.
Supplies
Card/Paper: White and kraft card, DCWV - Linen Closet
Stamps: Magnolia - Edwin in Miami, Memory Shells, Have a Sunny Day Text - Summer Memories Collection 2012
Colouring: Copics - E000, E00, E11, R20, E43, E47, E49, E02, E51, E53, E35, E50, BG000, BG01, BG05, BG10, BG15, BG23, C1, C3, C5, 0. Distress inks - antique linen, broken china.
Embellishments: Ribbon, jewels
Tools: Sewing machine, nesties
Thanks for looking x
Monday, June 4, 2012
Cupcake Challenge 195
Hello everyone, today over on Cupcake Challenge 195 it is my turn to choose the challenge and I chose the theme of tags. Once again, we are sponsored by our regular sponsor Simon Says Stamp and they are giving one lucky winner a $20 gift certificate to spend in their store.
I am also entering my tags for the following challenges; Simon Says Stamp and Secret Crafter Challenge 188 both have a theme of anything goes. Now, before I go any further I must warn you there are loads of pictures!!
I decided to prepare myself for christmas early as I'm always a last minute girl, so I have made a load of tags using various stamp sets from Waltzingmouse.....details of all the sets are given at the end of this post. For each of my tags I have used memento tuxedo black ink, cut them out using the relevant nestie and distressed them using vintage photo distress ink. Finally I added an extra long length of satin ribbon, to enable them to be tied around a bottle, bag, or gift.
For the standard tag shape I just used my corner chomper on the 1/2 inch setting to round off the corners.
Here are some finished off with green ribbon.
Burgundy ribbon....
And purple ribbon....
And finally, a picture of all 24 tags!!!!
Supplies
Card/Paper: White card
Stamps: WMS - Compliments of the season, seasonal remedies, seasons of love, very vintage christmas, vintage labels four
Ink: memento tuxedo black, Distress ink - vintage photo
Embellishments: Ribbon
Tools: Nesties, corner chomper, trouvaille
Thanks for looking x
Labels:
Cupcake,
Distress Inks,
DT,
Secret Crafter,
Simon Says,
Waltzingmouse
Subscribe to:
Posts (Atom)


